This AI marketing campaign tutorial gives you everything you need to launch a complete automated campaign in just 7 days even if you’re starting from scratch.
Launching an AI marketing campaign tutorial used to require a full marketing team and complex software. Today, entrepreneurs and small businesses can follow this AI marketing campaign tutorial and launch a complete, lead-generating system using automation tools, email marketing, and smart AI assistants.
In this step-by-step AI marketing campaign tutorial, you’ll learn exactly how to plan, build, and launch your first AI marketing campaign. Real results from businesses who followed this exact framework:
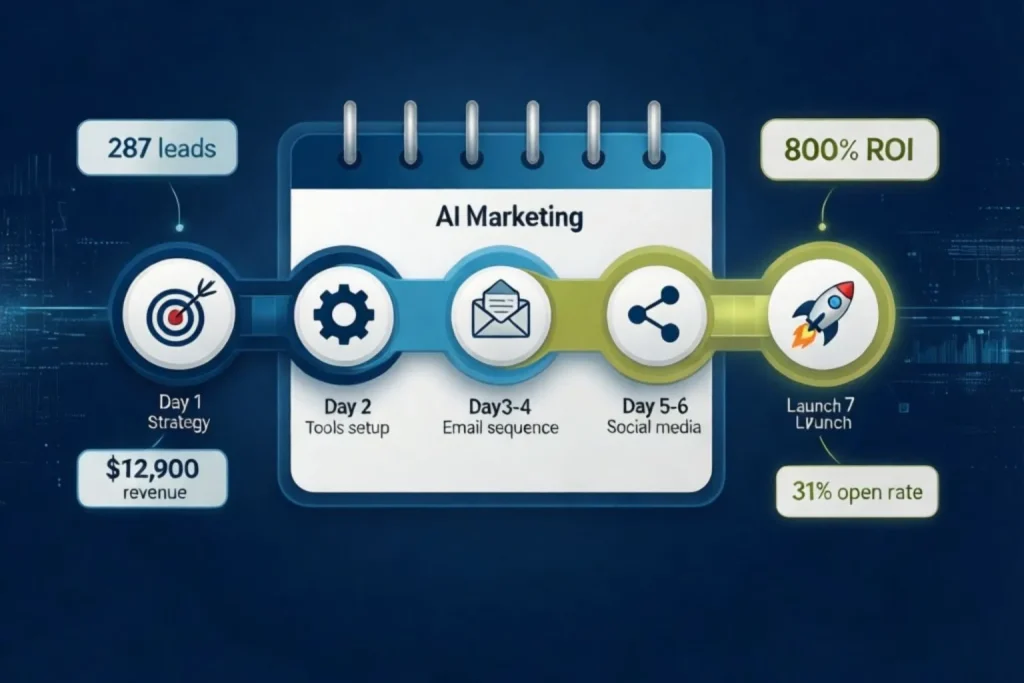
- E-commerce business ($420K revenue): 287 leads in first 30 days, $12,900 in attributed sales
- B2B SaaS startup (8 employees): 152 leads, 34 trial signups, $3,200 MRR added
- Local landscaping company: 94 leads, 37 consultations booked, $67,200 in new contracts
This guide is part of our complete AI marketing automation playbook for small businesses your go to resource for the full multi-channel strategy.
Table of Contents
Why a 7-day AI marketing campaign tutorial is realistic for small businesses
This AI marketing campaign tutorial is built around a simple truth: you don’t need 6 months to launch. You need 7 days and the right framework.
Most small businesses spend weeks “planning to launch a campaign” without ever executing. This AI marketing campaign tutorial forces you to stop planning and start generating leads in exactly one week.
According to HubSpot’s Marketing Statistics, businesses using marketing automation generate 451% more qualified leads than those relying on manual outreach. The gap between automated and manual is growing every month.
What You’ll Build:
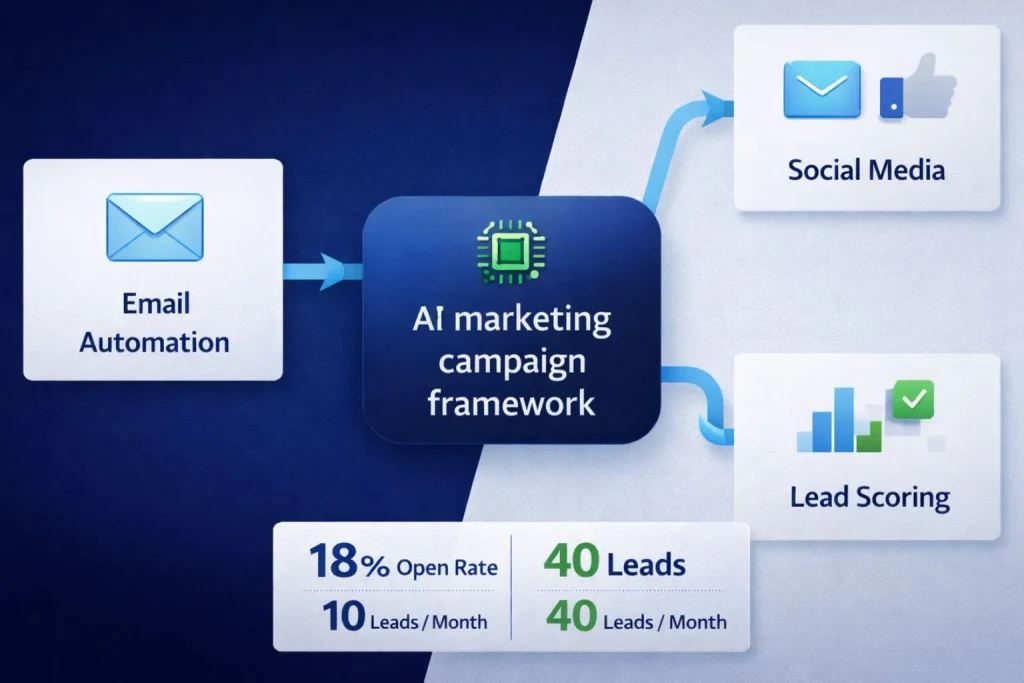
The 3-channel AI marketing campaign framework:
- .Email Automation sequence: 5-7 automated emails triggered when someone downloads your lead magnet.
- Social Media amplification: 15+ posts scheduled across LinkedIn, Twitter, or Facebook reinforcing your email messages.
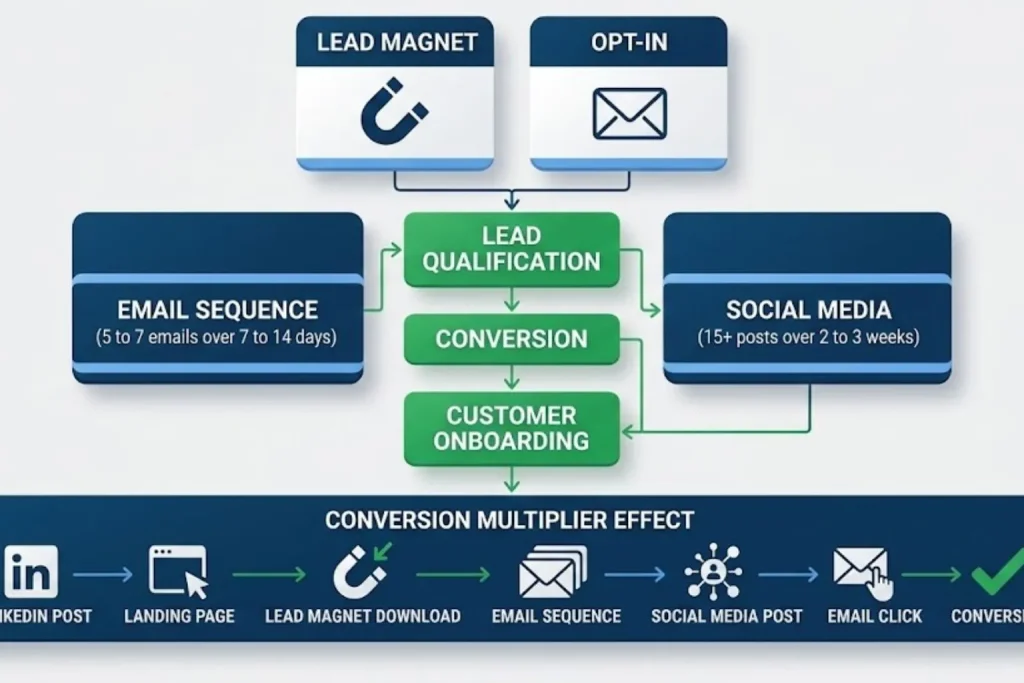
- Lead capture + nurturing system: A simple landing page connected to your email automation that captures leads and triggers the right follow-up sequence automatically
Expected results from an AI marketing Campaign
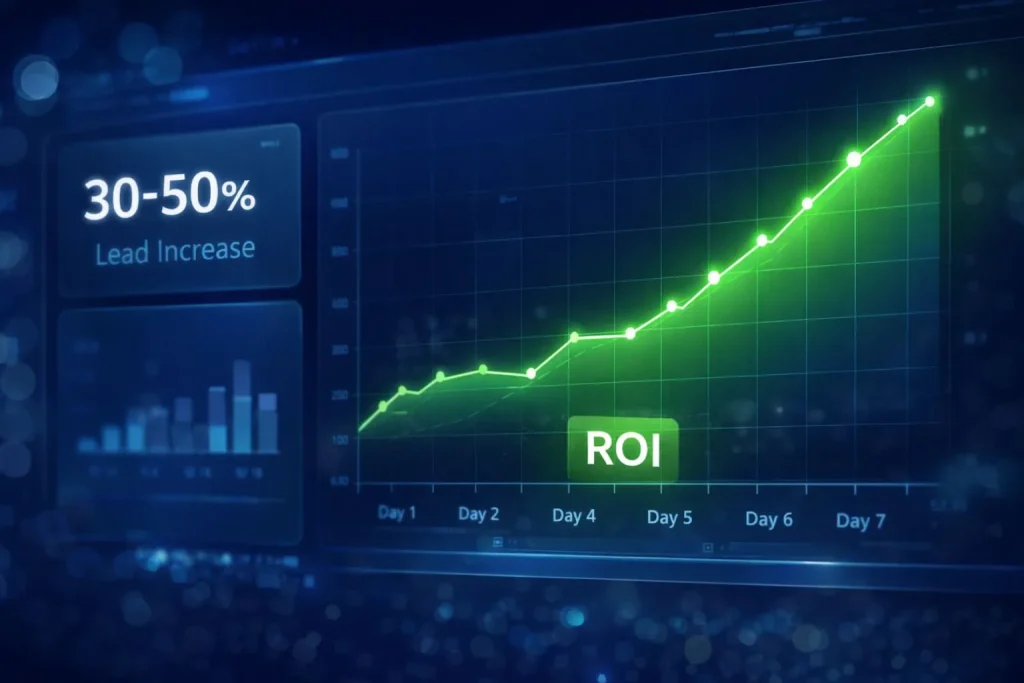
- Week 1: Campaign live, first 20–50 leads captured (momentum building)
- Week 2–4: 30–50% increase in qualified leads compared to manual outreach
- Month 2–3: Campaign optimized based on real data, generating 2–3x ROI on time invested
What this AI marketing campaign tutorial guide is not: This is not an enterprise-level campaign requiring six-figure budgets and a team of specialists.
This is not a “set and forget forever” solution. And it’s not for advanced marketers running
sophisticated attribution models across 10 channels.
This guide is for small business owners who need a functional, lead-generating campaign
running by next week. You’ll optimize over time, but your goal right now is speed to market, not
perfection.
AI marketing campaign Tutorial pre-launch checklist
Don’t start Day 1 without these basics ready. This AI marketing campaign tutorial requires specific assets that you should gather now.
Required assets
Lead magnet: A downloadable resource people actually want :
- PDF guide (5-10 pages on solving a specific problem)
- Checklist (simple, actionable steps)
- Template (spreadsheet, document, or tool they can use immediately)
- Calculator (ROI calculator, cost estimator, savings calculator)
Your lead magnet must solve one specific problem your target customer has right now. “Ultimate guide to everything” doesn’t work. “7-day social media content calendar for real estate agents” works.
- Basic website/landing page: You need somewhere to host your lead magnet signup form. A full website isn’t required. Tools like Carrd ($19/year), Leadpages ($37/month), or even a HubSpot free landing page work fine.
- Email marketing platform account: Even the free tier works to start. You’ll need this to send automated emails. We’ll cover tool selection on Day 2.
- Active social media profiles: 1-2 platforms where your target audience actually spends time. Dormant profiles with 6-month gaps between posts won’t work. You need accounts you’ve posted to at least once in the past 30 days.
- Clear offer or call-to-action: After someone reads your emails and engages with your content, what happens next? Book a call? Start a free trial? Request a quote? Know this before you start writing.
Optional assets to improve your AI marketing campaign tutorial
- Existing email list: Even 50-100 contacts gives you a head start, but you’ll build your list from scratch if needed. Don’t let “I don’t have a list” stop you from launching.
- Brand assets: Logo, brand colors, fonts make your campaign look polished, but AI tools can generate these in 30 minutes if you don’t have them yet.
- Detailed customer personas: You’ll refine these on Day 1. Don’t spend 2 weeks researching before starting.
Time investment for this AI marketing campaign tutorial
Day 1: 2 hours (strategy and goal setting)
- Day 2: 2–3 hours (tool setup)
- Days 3–4: 6–8 hours total (email sequence creation)
- Days 5–6: 4–5 hours total (social media setup)
- Day 7: 1–2 hours (final checks and launch)
Total: About 18-22 hours across 7 days. Most founders waste more than that weekly on unproductive marketing activities anyway. This time investment actually generates returns.
You can complete this part-time while running your business. Early mornings, evenings, or focused blocks during slower business hours all work.
Day 1 of your AI marketing campaign tutorial Strategy & goal setting
Day 1 of this AI marketing campaign tutorial is not about execution. It’s about clarity. You’ll answer three critical questions that determine whether your campaign succeeds or struggles.
Step 1: Define your AI marketing campaign objective
Pick ONE primary goal. Choose from these proven objectives:
- Lead generation (most common for SMBs): You want contact information from people interested in your offer. Success = number of qualified leads captured.
- Product launch awareness: You’re introducing something new and need initial traction. Success = signups, early adopters, or waitlist additions.
- Re-engage dormant customers: You have an existing customer base that’s gone quiet. Success = reactivation rate and repeat purchases.
- Event or webinar registrations: You’re driving people to a specific date-based event. Success = confirmed registrations and attendance.
Example of a good objective: “Generate 50 qualified leads for our CRM software targeting
agency owners with 5–25 employees.”
Example of a vague objective: “Increase brand awareness and engagement across all
channels.” (This is not measurable, not focused, and won’t guide your decisions.)
Write your objective in one clear sentence. If you can’t explain it in 15 seconds, it’s not clear
enough.
Step 2: Identify your target audience (45 minutes)
Answer these three questions:
- Who has the problem you solve? Be specific about demographics, job titles, company size, and industry. “Small business owners” is too broad. “E-commerce store owners doing $300K-$2M annually struggling with abandoned carts” is specific.
- What do they search for? What keywords and phrases do they type into Google when they’re looking for solutions? This tells you their intent and how to position your offer.
- Where do they hang out online? LinkedIn? Twitter? Industry-specific Facebook groups? Instagram? TikTok? Don’t guess look at where conversations about your
topic are happening.
Target avatar template:
- Avatar: Marketing Director at B2B SaaS companies
- Company Size: 20–100 employees
- Pain Point: Spending 15+ hours/week on manual email campaigns with declining open rates
- Goal: Automate email marketing to focus on strategy instead of execution
- Primary Channel: LinkedIn + Email
- Secondary Channel: Twitter
Fill this out for your specific audience. This template guides every decision you make for the
next 6 days.
Step 3: Set success metrics (30 Minutes)
How will you know if your campaign worked? Define clear metrics before you launch.
Primary metric (the one that matters most):
- Lead generation campaigns: Total qualified leads captured
- Product launch: Signups or pre-orders
- Re-engagement: Reactivation rate (% of dormant customers who take action)
- Event registrations: Confirmed attendees
Realistic first-month targets: 20–50 leads for most small businesses. Don’t expect 1,000 leads in Week 1. That’s not realistic for a first campaign with zero optimization.
Secondary metrics (nice to track but not the main goal):
- Email open rate (benchmark: 25–35% for automated sequences)
- Click-through rate (benchmark: 3–7% for B2B, 1–3% for B2C)
- Social media engagement (likes, shares, comments)
- Website traffic from campaign
Tertiary metrics (track if you’re running paid ads):
- Cost per lead
- Return on ad spend (ROAS)
Most small businesses over-complicate metrics. Focus on lead count first. Everything else is secondary until you hit consistent lead flow.
Day 1 deliverable checklist
Before moving to Day 2, confirm you have:
- Campaign objective written in one clear sentence
- Target avatar defined (who, what problem, where they are)
- Success metrics chosen (primary + 2–3 secondary)
- Lead magnet topic confirmed (what you’ll give away to capture leads)
If any of these are missing, stop. Day 2 will be guesswork without this foundation.
For the complete marketing automation strategy beyond this campaign, see our AI marketing automation playbook.
Day 2: of Your AI marketing campaign tutorial choose & configure your tools
This AI marketing campaign tutorial uses a minimum 3-tool stack. You don’t need 10 marketing tools for your first campaign..
The 3-Tool minimum stack
- Tool 1: Email Marketing Platform (the core of your campaign)
- Tool 2: Social Media Scheduler (amplification layer)
- Tool 3: Google Analytics 4 (free tracking)
Resist the urge to add more tools “just in case.” Every additional tool adds complexity, cost, and integration headaches. Master these 3 first.
Email platform selection (The core tool)
Your email platform is where 80% of your campaign magic happens. Choose carefully based on your budget and technical comfort level.
Option 1: HubSpot (Free tier)
- Best for: First-time automators who want an all-in-one system
- Includes: Email automation, CRM, forms, landing pages, basic analytics
- Free tier limitations: 2,000 emails/month, HubSpot branding on emails
- Setup time: 2–3 hours (more features = more setup)
- When to choose: You have no existing tools and want everything integrated in one place
Option 2: Mailchimp (Essentials plan $13/month for 500 contacts)
- Best for: Simple automation needs, e-commerce businesses
- Includes: Basic automation workflows, email templates, landing pages
- Limitations: Less advanced than ActiveCampaign, automation can be clunky
- Setup time: 1–2 hours (simpler = faster)
- When to choose: You want simplicity and don’t need complex segmentation
Option 3: Active campaign (Lite plan — $29/month for 1,000 contacts)
- Best for: Email-first businesses needing advanced automation
- Includes: Advanced automation builder, predictive sending, lead scoring, CRM
- Setup time: 3–4 hours (power comes with a learning curve)
- When to choose: Email is your primary customer communication channel
Decision framework:
- Budget <$50/month + beginner → HubSpot Free
- E-commerce + simple needs → Mailchimp
- Email-driven business + need power → ActiveCampaign
According to ActiveCampaign’s benchmark data, businesses using predictive sending see 25% higher open rates. For most businesses following this AI marketing campaign tutorial, HubSpot Free or Mailchimp Essentials is the right starting point.
For a detailed comparison of all platforms, see our AI automation tools ROI guide.
Day 3-4 of your AI marketing campaign tutorial build your email automation sequence
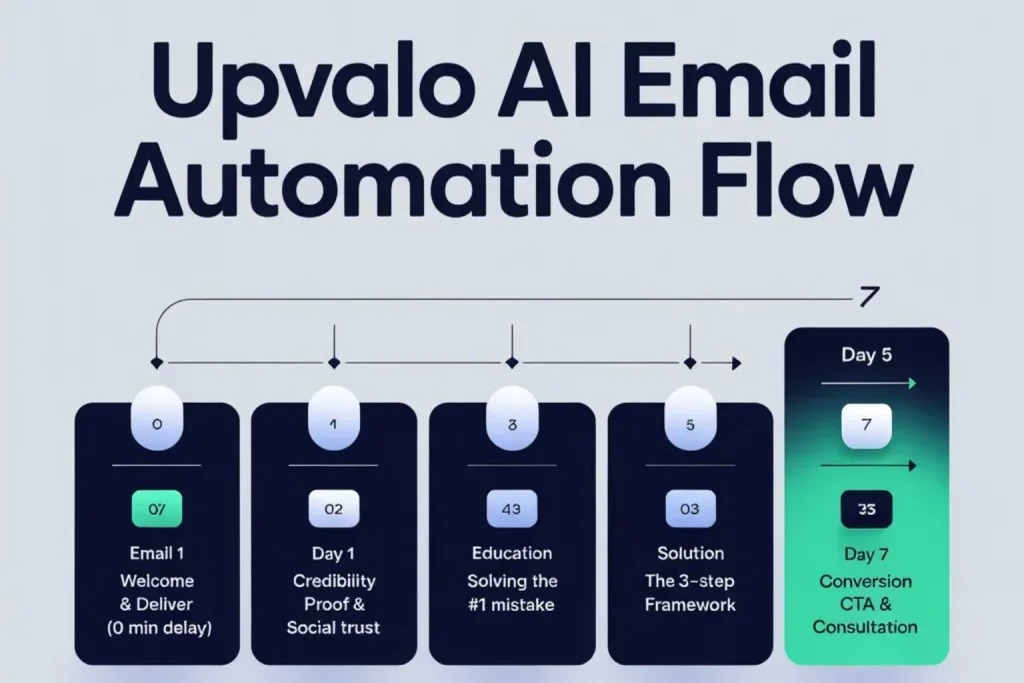
Days 3-4 are the core of this AI marketing campaign tutorial. You’ll write and build a 5-email sequence that runs automatically every time someone downloads your lead magnet.
The 5-Email welcome sequence (Standard framework)
Why 5 emails? Research shows 5-7 emails is the sweet spot for nurturing new leads. Fewer than 5 leaves money on the table. More than 7 risks overwhelming subscribers before they’re ready to buy.
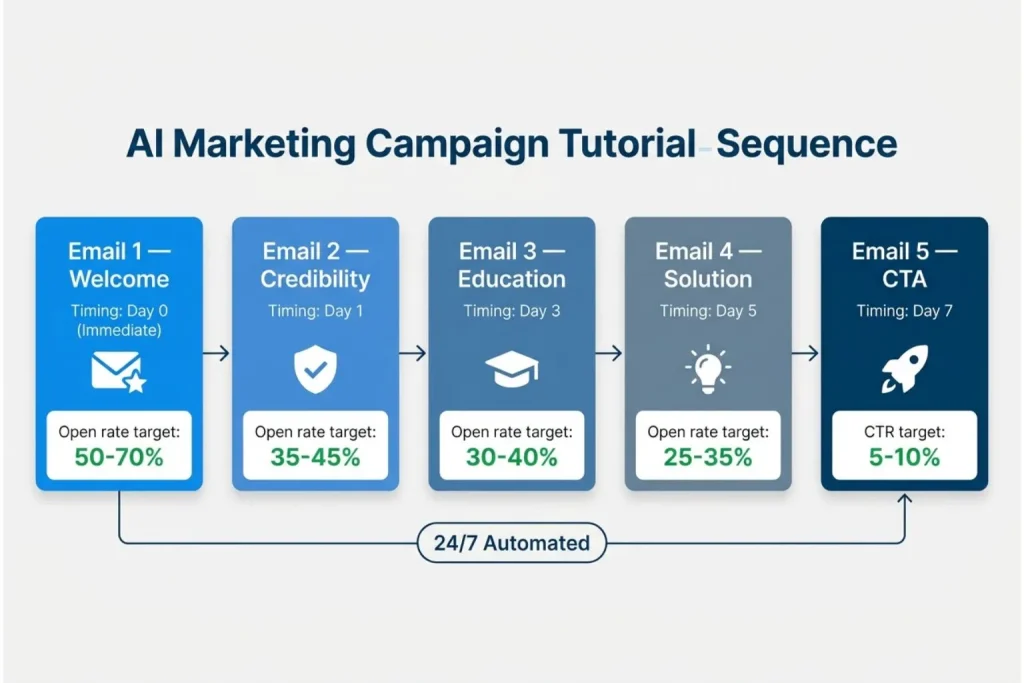
Email 1: Immediate value (sent immediately upon signup)
- Purpose: Deliver the lead magnet, set expectations
- Goal: 50-70% open rate (people are expecting this email)
- Content: Quick welcome, download link, preview of what’s coming next
Email 2: Establish credibility (sent 1 day after signup)
- Purpose: Answer “Who are you and why should I trust you?”
- Goal: 35-45% open rate
- Content: Your story, relevant credentials, social proof (testimonials, case studies)
Email 3: Educate on problem (sent 3 days after signup)
- Purpose: Deepen awareness of the problem you solve
- Goal: 30-40% open rate
- Content: Common mistakes, hidden costs of not solving the problem, “aha moment” insights
Email 4: Present solution (sent 5 days after signup)
- Purpose: Introduce your offer as the logical solution
- Goal: 25-35% open rate
- Content: How your product/service solves the problem, key features/benefits, differentiation
Email 5: Overcome objections + CTA (sent 7 days after signup)
- Purpose: Address hesitations and push toward action
- Goal: 20-30% open rate, 5-10% click-through on CTA
- Content: FAQ, risk reversal (guarantee/trial), urgency (“limited time” or “exclusive offer”), strong call-to-action
This spacing gives subscribers time to consume content without feeling bombarded. Adjust timing based on your industry (B2B can be slower, e-commerce can be faster).
Day 3 Morning: Write email copy using AI (2-3 hours)
You don’t need to be a copy writer. You need to be clear, helpful, and authentic. Use Chat GPT, Claude, or Copy.ai to draft emails in 10-15 minutes instead of writing from scratch.
Email 1 template – welcome + deliver:
Subject: Here’s your [Lead Magnet] + what’s next
Hey [First Name],
Thanks for downloading [Lead Magnet Name]! Here’s your instant access:
[BUTTON: Download Now]
Over the next week, I’ll share [specific benefit] to help you [achieve specific goal].
Looking forward to helping you [outcome].
[Your Name]
P.S. Hit reply if you have any questions. I read every response.
AI prompt templates for each email:
For email 1 (Welcome + Deliver):
“Write a welcome email for a [your business type, e.g., ‘B2B marketing automation software’]
targeting [specific avatar, e.g., ‘marketing managers at 50-200 employee companies’].
The lead magnet is: [resource name and what it provides, e.g., ‘Marketing Automation ROI Calculator
that shows potential time savings and cost reductions’].
Tone: Professional but friendly (not stuffy corporate, not overly casual)
Structure:
– Open with thank you and confirm what they signed up for
– Provide clear download button/link
– Preview what’s coming in next 4 emails (one sentence each)
– Personal sign-off with my name
Length: 150-200 words max
End with: P.S. Hit reply if you have questions – I read every response.”
For email 2 (Establish credibility):
“Write Email 2 in a welcome sequence for [your business].
This email should establish credibility and trust.
Include:
– Brief origin story (why we started this business): [1-2 sentences about your ‘why’]
– Relevant credentials: [your background, certifications, or experience]
– Social proof: [testimonial snippet, number of clients helped, results achieved]
Tone: Authentic and humble (not bragging, showing we understand their problem because we’ve been there)
Length: 200-250 words
Goal: Reader thinks ‘These people know what they’re talking about and have helped others like me’
End with: Tomorrow I’ll share [preview of Email 3 topic]”
For email 3 (Problem education):
“Write Email 3 that deepens awareness of the problem our product solves.
Problem we solve: [specific problem, e.g., ‘Small businesses waste 15+ hours/week on repetitive
marketing tasks like email follow-ups, social posting, and lead nurturing’]
This email should:
– Start with ‘Most [target audience] don’t realize…’
– Explain hidden costs of not solving this (time, money, missed opportunities)
– Share surprising stat or insight about the problem
– Include brief example or mini case study showing problem impact
Tone: Educational, not fear-mongering. We’re helping them see what they might have missed.
Length: 250-300 words
End with: In Email 4, I’ll show you exactly how [your solution type] fixes this.”
For email 4 (Present Solution):
“Write Email 4 that introduces our solution as the logical answer to the problem from Email 3.
Our solution: [your product/service and main differentiator]
Structure:
– Acknowledge the problem from Email 3
– Introduce our solution as ‘here’s what we built to solve this’
– Explain 3 key features/benefits (focus on outcomes, not just features)
– Differentiation: What makes us different from [main competitor or alternative]
– Soft CTA: ‘Learn more’ or ‘See how it works’ (not aggressive ‘Buy now’)
Tone: Helpful consultant, not pushy salesperson
Length: 300-350 words
Include: ‘Still not sure if this is right for you? Email 5 tomorrow covers the most common questions.'”
For email 5 (Overcome objections + CTA):
“Write Email 5, the final email in our welcome sequence. This should overcome objections and
include a strong call-to-action.
Address these common objections:
1. [e.g., ‘Is this too complicated to set up?’]
2. [e.g., ‘What if it doesn’t work for my industry?’]
3. [e.g., ‘How long until I see results?’]
For each objection, provide brief, reassuring answer (2-3 sentences)
Then include:
– Risk reversal (free trial, money-back guarantee, or no commitment option)
– Urgency element (limited-time bonus, exclusive offer, or ‘start today’ benefit)
– Clear CTA button text: [e.g., ‘Start Your Free Trial’ or ‘Book Your Strategy Call’]
Tone: Confident and helpful. We know this works, we want to help them get started.
Length: 350-400 words
End with: P.S. [Quick testimonial or success stat to reinforce confidence]”
Pro tips for using these prompts:
- Fill in the bracketed sections with your specific details
- Run the prompt through ChatGPT or Claude
- Copy the output but DON’T use it verbatim
- Edit for your brand voice (add personality, remove anything that sounds too AI-generated)
- Add 1-2 personal touches (your actual writing style, specific examples from your experience)
AI-generated drafts get you 70-80% done. The final 20-30% of editing makes it sound like you.
Repeat this process for emails 2-5. Budget 30-40 minutes per email including AI generation + editing.
Day 3 afternoon: Build automation workflow (1-2 hours)
Now you’ll connect your emails into an automated sequence inside your email platform.
Step-by-Step in HubSpot ( similar in Mailchimp/Active campaign):
Step 1: Navigate to Automation
- In HubSpot: Go to “Automation” → “Workflows”
- In Mailchimp: Go to “Automations” → “Customer Journeys”
- In ActiveCampaign: Go to “Automations” → “Create Automation”
Step 2: Create New Workflow
- Click “Create Workflow” (or “Create Automation”)
- Choose “From scratch” or “Blank workflow”
- Name it clearly: “Welcome Sequence – [Lead Magnet Name]”
Step 3: Set the enrollment Trigger
- Trigger type: “Form submission” or “Contact added to list”
- Specify which form or list (the one connected to your lead magnet landing page)
- Set to enroll contacts immediately upon trigger
Step 4: Add email actions
- Add action → “Send email” → Create Email 1
- Delay: 0 minutes (sends immediately)
- Add action → “Delay” → 1 day
- Add action → “Send email” → Create Email 2
- Add action → “Delay” → 2 days
- Add action → “Send email” → Create Email 3
- Continue pattern for Emails 4 and 5
Step 5: Configure each email
- Click into each “Send email” action
- Paste your written copy from Day 3 morning
- Add subject line (test multiple options if platform allows A/B testing)
- Insert personalization tokens: {{firstname}} or {{contact.firstname}}
- Add CTA buttons using the email builder (not text links)
- Set “From name” to your actual name, not “[email protected]”
Step 6: Review and activate
- Review the entire workflow visually (most platforms show a flowchart)
- Check that delays add up correctly (Email 5 should send 7 days after signup)
- Set workflow to “Active” (don’t do this yet – wait until Day 4 testing is done)
2026 Advanced Tip – AI Send-Time Optimization: Most email platforms now offer AI-powered send-time optimization that learns when each individual subscriber is most likely to open emails. Instead of sending Email 2 at 9am to everyone, the AI sends it at 9am to morning checkers, 2pm to afternoon readers, and 7pm to evening scrollers.
How to enable (if available in your platform):
- HubSpot: Workflow settings → “Optimize send time” toggle
- ActiveCampaign: Campaign settings → “Predictive sending”
- Mailchimp: Limited in lower tiers, available in Standard plan+
Expected impact: 5-15% increase in open rates compared to fixed-time sending. Enable this feature once you have 2-3 weeks of data (platform needs baseline behavior to predict optimal times).
Day 4: Test & Refine (1-2 hours)
Never launch a campaign without testing. Small mistakes (broken links, personalization errors) destroy credibility.
Testing checklist:
Send test emails to yourself
- Sign up using your personal email
- Verify you receive all 5 emails (you’ll get them in rapid succession in test mode)
- Check that download link works
- Verify personalization (your first name appears correctly)
– Check mobile display
- 60-70% of emails are opened on mobile devices
- Forward test emails to your phone
- Check formatting, button size, image loading
-Verify all links work
- Click every link in every email
- Ensure landing pages load correctly
- Check that CTA buttons go to the right destination
-Test spam score
- Use Mail-Tester.com (free)
- Send a test email to the address they provide
- Aim for score of 8/10 or higher
- If score is low: Remove spammy words (“free money”, “guaranteed”, “act now”), reduce number of links, add text-to-image ratio
-Check email timing
- Verify delays are configured correctly (not all sending immediately)
- Confirm timezone settings (send during business hours, not 3am)
Common issues to fix on Day 4:
- Subject lines too long: Mobile truncates after 50 characters. Keep subjects punchy.
- Broken image links: If images don’t load, replace with text or re-upload to email platform directly.
- Personalization tokens not working: Double-check syntax ({{firstname}} vs {{first_name}} – varies by platform).
- Emails going to spam: Too many exclamation points, ALL CAPS text, or suspicious links. Tone it down.
Day 3-4 Deliverable checklist
Before moving to Day 5, confirm:
- 5 emails written (200-300 words each)
- Automation workflow built in email platform
- All emails tested on desktop and mobile
- Spam score checked (8/10+ ideal)
- Personalization working correctly
- All links functional
- Workflow saved (but NOT activated yet – wait for Day 7 launch)
Days 3-4 are the hardest part of the 7-day framework. Writing and building takes focus. But once this sequence is done, it runs forever. You’ll write these 5 emails once and they’ll nurture hundreds or thousands of leads over the next 6-12 months.
For advanced email automation strategies, see our AI email marketing automation guide.
Day 5-6: Set up social media amplification
This AI marketing campaign tutorial uses social media as your amplification layer. Email hits your subscribers. Social hits 500-1,500 additional people.
The multiplier effect:
- Email alone: 100 people see your message
- Email + Social: 100 email subscribers + 500-1,500 social impressions = 600-1,600 total reach
- Cross-channel reinforcement: Someone sees your post on LinkedIn, then receives your email, then sees another post = 3 touchpoints building familiarity and trust
What to automate (and what to keep human):
- Automate: Content scheduling, link sharing, evergreen posts
Don’t automate:
- Direct responses to comments, DMs, real-time engagement, community conversations
Day 5 Morning: Create social media content (2 hours)
You don’t need 50 posts. You need 15 strategic posts that support your email sequence.
The 3-Post-Per-email framework:
For each of your 5 emails, create 3 corresponding social posts:
- Post 1 — Teaser: Hook/curiosity-driven, no link yet
- Post 2 — Value: Share one key insight with stat or example
- Post 3 — CTA: Direct call-to-action with link
Total: 5 emails × 3 posts per email = 15 social posts
Example for email 3 (Problem education):
Post 1 – Teaser (posted Day 2):
Most small businesses waste 15+ hours every week on repetitive marketing tasks.
There’s a better way. (Thread 👇)
Post 2 – Value (posted Day 3):
Here’s what we automated last month:
- Email follow-ups: 10 hrs/week → 1 hr/week
- Social media posting: 8 hrs/week → 2 hrs/week
- Lead responses: 12 hrs/week → instant 30 hours saved = $1,350/month in labor costs.
Post 3 – CTA (posted Day 4):
Curious how much time YOUR business could save with marketing automation?
Grab our free ROI calculator 👇
AI Prompt for social posts:
“”Create 3 LinkedIn posts promoting [my lead magnet] for [target audience].
Post 1 (Teaser): 80 words, curiosity-driven, no link.
Post 2 (Value): 120 words, share one insight with stat.
Post 3 (CTA): 60 words, direct call-to-action with link.
Tone: Professional but conversational. B2B focus.
Day 5 Afternoon: Platform-specific adaptation (1 hour)
Don’t post identical content to every platform. Each has different formats and audiences.
LinkedIn (best for B2B):
- Length: 150-200 words ideal (short paragraphs, lots of white space)
- Format: Text-heavy, minimal emojis (1-2 max)
- Best times: Tuesday-Thursday, 8-10am or 12-1pm EST
- Engagement tip: Start with a hook question or bold statement
Twitter/X (best for tech/SaaS):
- Length: 120-280 characters (short and punchy, or use threads for longer content)
- Format: Conversational, 1-2 emojis, hashtags sparingly
- Best times: Monday-Friday, 9-11am or 5-6pm EST
- Engagement tip: Ask questions, encourage replies
Facebook (best for B2C, local businesses):
- Format: More casual tone, images/videos perform better than text-only
- Length: 80-150 words
- Best times: Wednesday-Friday, 1-4pm EST
- Engagement tip: Use native video when possible, tag relevant local groups
Adaptation Process:
- Write primary version for your main platform (probably LinkedIn for B2B)
- Shorten for Twitter (cut to core message)
- Casualize for Facebook (add personal touch, more emoji)
Day 6: Schedule content in buffer (2 hours)
Time to load all 15 posts into Buffer and set your posting schedule.
Scheduling strategy:
- Frequency: 1 post per day per platform (don’t over-post and annoy followers)
- Timing: Use platform-specific best times from above
- Variety: Rotate through teaser/value/CTA types (don’t spam CTAs)
Day 5-6 Deliverable checklist
Before moving to Day 7, confirm:
- 15 social media posts written (3 per email × 5 emails)
- Posts adapted for each platform (LinkedIn, Twitter, Facebook as applicable)
- All posts scheduled in Buffer/Hootsuite with specific dates and times
- Posting calendar documented (spreadsheet or screenshot so you know what goes out when)
- Images sourced or created for key posts
- Links added to CTA posts (verify they work)
Social media feels like “extra work” on top of email, but it’s what takes your campaign from good to great. Email hits 100 subscribers. Social hits 500-1,500 additional people. That expanded reach generates the extra 20-30 leads per month that make this campaign profitable.
Ready to go deeper on social? Our dedicated AI social media automation guide covers platform-specific strategies, content formats, engagement automation, and a complete 4-week setup plan the natural next step after launching your campaign.
Day 7: of your AI marketing campaign tutorial launch, monitor & optimize
Day 7 is go-time. Your campaign is built. Now you activate it, monitor for issues, and make quick fixes if needed.
Morning: Pre-launch final checks (1 hour)
The 10-Point launch checklist:
- Email automation workflow: Switch from “Draft” to “Active” mode
- Lead magnet delivery: Sign up one more time with a test email to verify delivery works
- Landing page/form: Live, accepting submissions, not showing errors
- Social posts: All scheduled correctly (double-check dates match your plan)
- GA4 tracking: Verify conversion goals are set up (form submissions tracked)
- Thank you page: Working correctly after form submission
- Email “From” name: Shows your real name or company name, NOT “[email protected]”
- Mobile display: Final check on your phone for emails and landing page
- Spam score: Retest one email to confirm it’s still 8/10+
- Backup: Export all email copy and workflow settings (safety net if something breaks)
Afternoon: Go Live (1 hour)
Launch sequence:
Step 1: Publish your first social post (the campaign announcement)
“We just launched [campaign name / lead magnet title]!
If you’ve been struggling with [specific problem], this free resource is for you.
Inside: [3 specific benefits] — Grab yours here 👇 [Link]”
Post this to your primary platform (LinkedIn/Twitter/Facebook) first. This is your “opening bell.”
Step 2: Activate email workflow
- Go to your email platform dashboard (HubSpot/Mailchimp/ActiveCampaign)
- Navigate to “Automation” or “Workflows” section
- Find your saved “Welcome Sequence” workflow
- Switch status from “Off” or “Draft” to “Active” or “Live”
- Confirm activation (platform will usually ask “Are you sure?”)
- Verify Email 1 arrives within 1-2 minutes (should be immediate)
- Critical check: Send yourself a test by signing up with a new email address
- Check your workflow dashboard shows “1 contact enrolled” or similar confirmation
If Email 1 doesn’t arrive within 5 minutes:
- Check workflow status (is it actually “Active”?)
- Verify trigger is connected to your signup form
- Check spam/junk folder
- Review email sending settings (some platforms require domain verification first)
Don’t move to Step 3 until you’ve confirmed the workflow sends emails automatically.
Step 3: Promote to Existing Networks
- Send announcement to existing email list if you have one (separate broadcast, not part of automation)
- Share in relevant online communities (Reddit, Facebook groups – follow each community’s rules on self-promotion)
- Post in your personal social networks (LinkedIn profile, Twitter, etc.)
- Consider reaching out to 5-10 connections directly if appropriate
Step 4: Initial monitoring (First 4 Hours)
Watch for these signals in the first few hours:
Good signs:
- Signups are coming in (even 2-3 in first hour is great)
- Email 1 is sending immediately after signup
- No error emails or bounce notifications
- Social posts are publishing as scheduled
Red flags requiring immediate action:
- Zero signups after 2-3 hours (traffic problem – need to drive more people to landing page)
- Email 1 not sending automatically (workflow might not be active)
- High bounce rate on emails (email addresses invalid or spam filtering)
- Landing page showing errors or not loading
Fix red flags immediately. Don’t wait until tomorrow.
Days 7-14: Active monitoring & quick wins
Daily monitoring checklist (10-15 minutes per day):
Check these metrics in your email platform and GA4:
- Total signups today (track in simple spreadsheet)
- Email open rates (should be 25-35%+ for automated sequences)
- Click-through rates (should be 3-7%+ for B2B, 1-3% for B2C)
- Social media engagement (likes, shares, comments on scheduled posts)
- Any error emails or complaints
Red flags to watch:
- Open rate below 15%: Your subject lines may be weak or emails are going to spam. Check spam folders, adjust subject lines, reduce spammy words.
- Click-through rate below 1%: Your call-to-action isn’t compelling or is unclear. Make CTA buttons more prominent, test different button text.
- No signups after Day 2: You have a traffic problem, not a campaign problem. You need to drive more people to your landing page through ads, organic social, outreach, or partnerships.
- High unsubscribe rate (>2% per email): You’re either targeting the wrong audience or your content isn’t valuable. Review your targeting and email value proposition.
Quick optimizations (Week 2):
Don’t change everything at once. Test one variable at a time.
- If open rates are low: A/B test 3 new subject line styles (curiosity-driven vs. benefit-driven vs. question format). Most email platforms allow A/B testing built-in.
- If click rates are low: Make CTAs more prominent. Test button colors (bright vs. neutral), button text (“Download Now” vs. “Get Started”), and placement (top vs. bottom of email).
- If social engagement is weak: Adjust posting times. Review which posts got the most likes/shares and double down on those topics and formats.
- If conversion from lead to customer is slow: Add urgency to Email 5 (“Limited time”, “Exclusive for new subscribers”, “Book a call this week”).
Day 7 deliverable checklist
By end of Day 7, you should have:
- Campaign fully live (emails + social posts running)
- First 5-10 signups confirmed (or clear action plan if zero signups)
- No critical technical errors (emails sending, landing page working)
- Monitoring system in place (daily 10-15 min check-ins scheduled in your calendar)
- Simple tracking spreadsheet started (date, signups, opens, clicks)
Celebrate this milestone. You built and launched a complete AI marketing campaign in 7 days. Most small businesses never get this far. You’re already ahead of 80% of competitors.
Week 2+: Optimization & scaling your AI marketing campaign
After following this AI marketing campaign tutorial and launching your campaign, the real work begins: optimizing based on real data.
When to start optimizing
Rule of thumb: Wait until you have 100+ subscribers OR 7 full days of data, whichever comes first.
Why wait?
- Small sample sizes (<100 people) give misleading results
- You need at least one full week to see complete email sequence performance
- Changing things too early is guesswork, not data-driven optimization
What to optimize first (Priority order)
1. Email subject lines (Biggest ROI for effort invested)
If open rate is below 20%, test new subject line approaches:
- Curiosity-driven: “The mistake costing you 15 hours every week”
- Benefit-driven: “Save 30 hours/month with this automation framework”
- Question format: “Are you wasting time on manual marketing tasks?”
Run A/B tests if your platform supports it. Otherwise, change subject lines and compare performance week-over-week.
2. Email call-to-actions (Second biggest impact)
If click-through rate is below 2%, make CTAs more prominent:
- Use button format, not text links
- Test button colors (orange/red typically perform best)
- Simplify button text (“Get Started” outperforms “Click here to download your comprehensive guide”)
- Add CTA buttons multiple times in longer emails (top and bottom)
3. Social media posting times
Review Buffer analytics after 2 weeks. Which posts got the most engagement? What times did they go out?
Double down on high-performing time slots. Cut or move posts from low-engagement times.
4. Landing page headline
If you’re getting traffic but low conversion to signups, your headline might not be compelling enough.
Test 2-3 variations:
- Problem-focused: “Tired of wasting 15 hours/week on manual marketing?”
- Solution-focused: “Automate your marketing in 7 days (free guide)”
- Outcome-focused: “Generate 50% more leads without hiring”
Scaling Checklist (Month 2-3)
Once your baseline campaign is performing well (25%+ email open rate, 3%+ click rate, consistent lead flow), you’re ready to scale.
Scaling tactics:
- Extend email sequence: Add 2-3 more nurture emails (Days 10, 14, 21) for subscribers who haven’t converted yet. Continue providing value and soft CTAs.
- Create second lead magnet: Different resource targeting a slightly different pain point. Run parallel campaigns to test which performs better.
- Add paid traffic: Once you know the campaign converts, invest $200-500/month in Facebook Ads or Google Ads sending cold traffic to your proven landing page.
- Expand to additional platforms: If LinkedIn worked well, test Twitter or Instagram. Don’t add all platforms at once.
- Create video content: Repurpose top-performing social posts into short video (Loom, iPhone camera) for LinkedIn or YouTube.
- Budget recommendation for ads: $200-500/month once organic campaign proves it generates positive ROI. Don’t spend ad money on unproven campaigns.
Success metrics benchmark (30-90 Days)
How do you know if your campaign is working? Compare your results to these benchmarks.
Good Performance (realistic for most SMBs):
- 30-50 new leads per week
- 25-35% email open rate
- 3-7% email click-through rate
- 5-10% lead-to-customer conversion rate (measured over 90 days, not Week 1)
Great Performance (top 20% of campaigns):
- 75-150 new leads per week
- 35-45% email open rate
- 8-12% email click-through rate
- 12-18% lead-to-customer conversion rate
Your results will vary based on:
- Industry (B2B SaaS typically converts better than e-commerce)
- Offer strength (free trial > lead magnet > generic newsletter signup)
- Audience quality (targeted list from content marketing > cold paid traffic)
- Follow-up process (automated email + human sales call > automated email alone)
Don’t panic if you’re not hitting “great” benchmarks in Month 1. “Good” performance that’s consistent is far better than sporadic “great” performance that can’t be sustained.
Common mistakes AI marketing campaign tutorial to avoid hem
Learn from others’ failures. These are the top 5 mistakes that kill first campaigns.
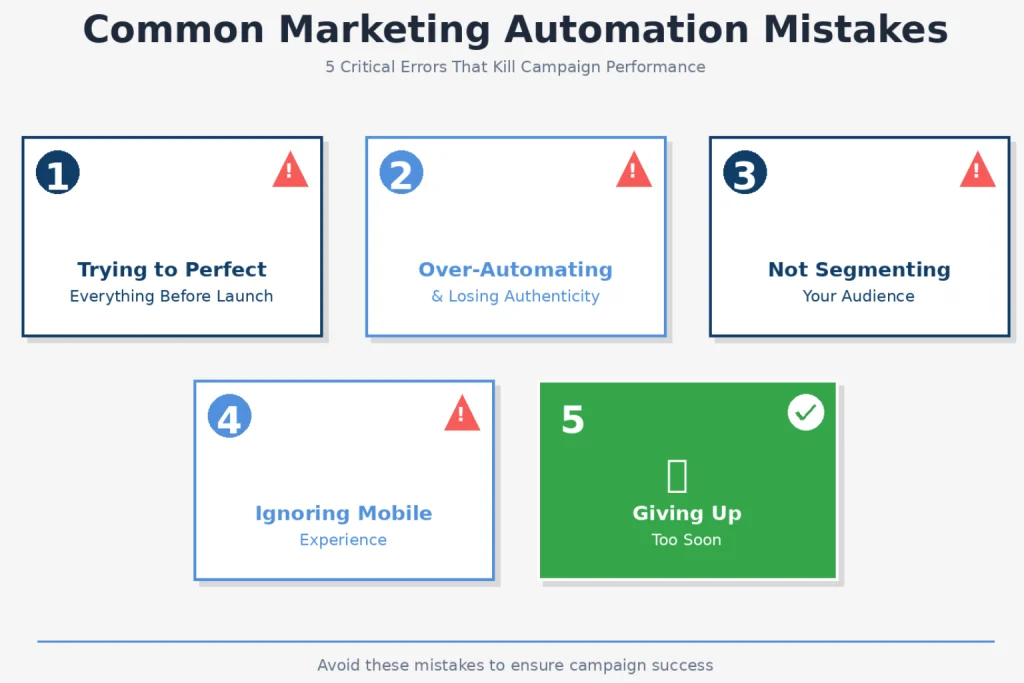
Mistake N°1: Trying to perfect everything before launching
The problem: You spend 3 weeks tweaking email copy, designing perfect graphics, researching every tool option, comparing 15 different platforms and never actually launch.
The cost: Every week you delay is a week of zero leads. If a decent campaign generates 30 leads/week, 3 weeks of perfectionism costs you 90 potential leads.
The fix: Launch with “good enough” in 7 days. You’ll learn more from real subscriber behavior in Week 1 than from 3 months of hypothetical planning.
Action: Set a hard deadline. Day 7 = launch, no excuses. You can optimize after launch based on real data.
Mistake N°2: Over-automating and losing authenticity
The problem: You automate everything including responses to specific questions, comments, and DMs. Every interaction feels robotic. People disengage because they’re obviously talking to a bot.
The cost: Lower engagement, higher unsubscribe rates, damaged brand reputation.
The fix:
- Automate distribution: Email sequences, social media scheduling, lead capture
- DON’T automate relationships: Direct replies to questions, comment responses, customer conversations
Example:
- Automate: Welcome email sequence after lead magnet download
- Don’t automate: Reply to someone asking “Does this work for my specific industry?” (respond personally in 1-2 sentences)
Mistake N°3: Not segmenting your audience
The problem: Sending identical messages to everyone regardless of their industry, company size, role, or behavior. A CEO and an intern get the same email. A hot lead and a cold prospect get the same follow-up.
The cost: 20-30% lower email performance compared to segmented campaigns.
The fix: Even basic segmentation dramatically improves results.
Week 1 segmentation (keep it simple):
- Segment by lead magnet downloaded (if you have multiple)
- Segment by signup source (organic vs. paid traffic)
Week 4-8 segmentation (add complexity):
- Segment by email engagement (opened vs. didn’t open Email 1)
- Segment by industry or company size (if you collected this data)
- Segment by behavior (clicked specific links vs. didn’t click)
Action for Day 8-14: Add basic tags in your email platform when new subscribers sign up. Tag = lead magnet name or traffic source. Use these tags to send slightly different Email 4 or 5 based on interests.
Mistake N°4: Ignoring mobile experience
The problem: You design and test everything on your desktop computer. Your emails look beautiful on a 24-inch monitor but are unreadable on an iPhone.
The reality: 60-70% of emails are opened on mobile devices. If your campaign isn’t mobile-optimized, you’re losing the majority of your audience.
The fix:
- Use single-column email templates (not multi-column layouts that break on mobile)
- Keep subject lines under 50 characters (mobile truncates longer subjects)
- Make CTA buttons large and thumb-friendly (minimum 44×44 pixels)
- Use legible font sizes (minimum 14px for body text, 18px+ for headlines)
- Test EVERY email on your actual phone before sending (not just desktop preview mode)
Action: Before activating your workflow on Day 7, forward all test emails to your personal phone. Read them. Click buttons. If anything is hard to read or tap, fix it.
Mistake N°5: Giving up too soon
The problem: You launch, see modest results in Week 1 (20-30 leads), and assume the campaign failed. You abandon it and move on to the next tactic.
The reality:
- Week 1-2: Building momentum (20-30 leads is normal and good)
- Week 3-4: Momentum grows as you optimize (40-60 leads typical)
- Month 2-3: Campaign matures and hits consistent stride (60-80+ leads)
Most campaigns don’t hit peak performance until 4-6 weeks in. Early abandonment is leaving money on the table.
The fix: Commit to running your campaign for 60-90 days before judging success or failure. Make small optimizations weekly, but don’t tear everything down and rebuild unless it’s truly broken (zero leads after 2 weeks).
Action: Set a calendar reminder for Day 60 titled “Campaign Performance Review.” Until that date, focus on optimization, not replacement.
Real campaign examples from this AI marketing campaign tutorial framework
Theory is nice. Real numbers are better. Here are three small businesses that launched using this exact framework.
Example 1: E-commerce business ($420K annual revenue)
Business: Online fitness equipment store (4 employees) Industry: E-commerce / Health & Fitness Campaign Goal: Generate leads for new home gym product line
7-Day Execution:
- Day 1-2: Created “Home Gym Setup Guide” PDF
- Day 3-4: Built 5-email sequence (workout tips + product highlights, not aggressive selling)
- Day 5-6: Scheduled 15 posts across Instagram and Facebook (visual-heavy, workout demos)
- Day 7: Launched + boosted top Facebook post with $50 ad spend
Results (First 30 Days):
- 287 total leads captured (from approximately 2,000 landing page visitors)
- 14.4% conversion rate (landing page visitors to leads)
- Email open rate: 31% average across sequence
- 43 purchases directly attributed to email sequence (tracked via UTM codes)
- $12,900 in revenue from campaign
- ROI: Approximately 800% (campaign setup cost ~$1,600 including freelance graphic designer for social posts)
Key Takeaway (Owner quote): “We didn’t overthink it. We launched fast with a simple PDF, then optimized weekly based on what people actually clicked on. The email automation let us follow up with 287 people simultaneously, which we could never do manually with our small team.”
Example 2: B2B SaaS startup (8 Employees, $240K ARR)
Business: Project management software for creative agencies Industry: B2B SaaS Campaign Goal: Generate trial signups for their platform
7-Day execution:
- Day 1-2: Defined ICP (agency owners and project managers, 5-20 employees, using spreadsheets or basic tools)
- Day 3-4: Wrote 5-email “Agency Productivity Blueprint” sequence (time tracking, client communication, project workflows)
- Day 5-6: Scheduled LinkedIn content only (primary platform for their B2B audience)
- Day 7: Launched with $200 LinkedIn Ads budget targeting agency decision-makers
Results (First 30 Days):
- 152 leads captured
- Email open rate: 38% (B2B tends higher than B2C)
- 34 trial signups (22% lead-to-trial conversion rate)
- 8 paid customers (24% trial-to-paid conversion)
- $3,200 in new MRR (monthly recurring revenue)
- Annual contract value: $38,400 from this one campaign
Key Takeaway (Founder quote): “LinkedIn + Email was the perfect combo for our B2B audience. We spent $200 on ads and generated $38K in annual contract value. The 7-day framework forced us to stop planning and start executing. We’d been ‘planning to launch a campaign’ for 3 months before this.”
Example 3: Local service business (Landscaping, 6 employees)
Business: Residential landscaping company serving 20-mile radius Industry: Local Services / Home Improvement Campaign Goal: Book spring consultations (highest-value season)
7-Day execution:
- Day 1-2: Created “Spring Yard Transformation Checklist” (seasonal tasks, common mistakes, when to hire pros)
- Day 3-4: Built 5-email sequence (lawn care tips, seasonal offers, consultation booking)
- Day 5-6: Scheduled Facebook posts targeting local area (before/after photos, customer testimonials)
- Day 7: Launched + posted in 5 local Facebook community groups (following community rules on business posts)
Results (First 30 Days):
- 94 leads (impressive for hyper-local business in small market)
- 37 consultation bookings (39% lead-to-consultation conversion rate)
- 21 signed contracts (57% consultation-to-customer rate)
- Average project value: $3,200
- Total revenue from campaign: $67,200 in signed contracts
- ROI: Immeasurable (used only free tools, zero ad spend)
Key Takeaway (Owner quote): “We serve a 20-mile radius, so 94 leads in our area is massive for us. Before this campaign, we’d get maybe 10-15 inquiries per month during spring season. The email automation meant every single person got consistent follow-up and educational content, which we never had time for before. The consultations basically booked themselves.”
Pattern across all three:
- Simple lead magnet (PDF guide or checklist, not complex)
- Platform-specific approach (didn’t try to be everywhere at once)
- Launched in 7 days (didn’t wait for perfect)
- Optimized after launch (made weekly improvements based on data)
- Email was core, social was amplification
Tools & resources checklist for your AI marketing campaign tutorial
Email marketing platforms
Important note: All tool links below should open in new tabs so you don’t lose your place in this guide. Right-click and select “Open in new tab.”
HubSpot (Free tier available)
- Best for: Beginners wanting all-in-one solution
- Free tier includes: 2,000 emails/month, basic automation, CRM, forms, landing pages
- Paid tiers: $45-$800/month
- Website: HubSpot.com
Mailchimp (Free tier up to 500 contacts)
- Best for: Simple automation, e-commerce
- Essentials plan: $13/month for 500 contacts
- Website: Mailchimp.com
Active Campaign (14-day free trial)
- Best for: Advanced email automation and segmentation
- Lite plan: $29/month for 1,000 contacts
- Website: ActiveCampaign.com
Social media schedulers
Buffer (Free tier: 3 profiles, 10 posts per profile)
- Best for: Beginners, simple scheduling
- Paid: $6/month per additional social profile
- Website: Buffer.com
Hootsuite (30-day free trial)
- Best for: Teams, agencies, advanced analytics
- Professional plan: $49/month
- Website: Hootsuite.com
AI Writing tools
ChatGPT (Free tier available)
- Use for: Email copy, social media posts, subject lines
- Plus plan: $20/month (faster, more advanced)
- Website: chat.openai.com
Claude (Free tier available)
- Use for: Long-form content, email sequences
- Website: claude.ai
Copy.ai (7-day free trial)
- Best for: Marketing-specific templates and frameworks
- Starter plan: $49/month
- Website: Copy.ai
Analytics
Google Analytics 4 (Free)
- Essential for: Website tracking, conversion tracking, campaign performance
- Website: analytics.google.com
Email Platform built-in Analytics
- All email platforms (HubSpot, Mailchimp, ActiveCampaign) include open rates, click rates, and basic reporting
- Use these before investing in advanced analytics tools
Design & media tools (Optional)
Canva (Free tier available)
- Use for: Social media graphics, simple designs
- Pro plan: $15/month (more templates, brand kit)
- Website: Canva.com
Unsplash (Free)
- Use for: High-quality stock photos
- Website: Unsplash.com
Downloadable resources from this guide
These resources are available for download:
- 7-Day Launch Checklist (PDF)
- Daily task breakdown with checkboxes
- Time estimates for each task
- Troubleshooting tips
- 5-Email Sequence Templates (Google Doc)
- Fill-in-the-blank templates for all 5 emails
- Subject line variations
- CTA button text examples
- Social Media Content Calendar (Excel/Google Sheets)
- 15 pre-formatted post templates
- Posting schedule framework
- Platform-specific timing recommendations
- Campaign Success Tracker (Spreadsheet)
- KPI tracking template (signups, opens, clicks, conversions)
- Weekly and monthly summary views
- ROI calculator built-in
Frequently asked questions about this AI marketing campaign tutorial
Can I really do this in 7 days while running my business?”
Yes. This AI marketing campaign tutorial requires 2-4 hours daily. Most business owners already spend 15-20 hours weekly on unproductive marketing activities. If you can’t find 3 hours per day, extend the framework to 10-14 days.
“What if I don’t have a lead magnet yet?”
Create a simple one in 2-3 hours:
- Easiest (1-2 hours): Checklist — list 7-15 steps to solve a specific problem, format in Canva, export as PDF
- Medium (2-3 hours): Template — fill-in-the-blank spreadsheet or document
- Higher effort (3-4 hours): Short guide — 5-10 pages using AI to draft initial content
“Do I need to spend money on tools?”
- Minimum spend: $0 — HubSpot Free + Buffer Free + GA4 + ChatGPT Free
- Realistic spend: $15-50/month — Mailchimp ($13) or ActiveCampaign ($29) + Buffer ($6)
Don’t overspend on tools before you have traction.
“What if I don’t have an existing email list?”
That’s exactly why you’re running this campaign. Every successful email list started at zero subscribers. Focus on creating a valuable lead magnet, driving traffic to your landing page, and letting the automation nurture new subscribers.
“What if my industry is different?”
- B2B (SaaS, consulting, agencies): Longer sequences (7-10 emails), focus on LinkedIn
- E-commerce: Shorter sequences (5-7 emails), add abandoned cart automation
- Local services: Focus on Facebook, emphasize local testimonials, consultation-based CTA
- Professional services: Educational content focus, trust-building emphasis
“Can I use this for B2C / consumer products?”
Yes. B2C modifications: shorter email sequences (5 emails), faster timing (every 1-2 days), Instagram/Facebook focus, CTAs push toward purchase.
Your next steps after this AI marketing campaign tutorial :From launch to long-term success
You’ve read the guide. Now it’s time to execute.
Immediate action (This week)
Don’t bookmark this and “come back to it later.” Later never comes.
Today (right now):
- Read through this guide one more time if needed
- Confirm you have the pre-launch assets (or know what to create)
- Block 2-3 hours on your calendar for tomorrow (Day 1)
Tomorrow – Day 1:
- Complete campaign strategy worksheet (30-60 minutes)
- Define objective, target audience, success metrics
- Confirm lead magnet topic
Day 2:
- Sign up for email platform (HubSpot Free or Mailchimp recommended)
- Connect Buffer for social media
- Install GA4 on website
- Total time: 2-3 hours
Days 3-6:
- Follow the daily framework exactly as written
- Don’t skip ahead, don’t fall behind
- Budget 3-4 hours per day
Day 7:
- Run final checklist
- Launch in afternoon
- Monitor first 4 hours closely
Reality check: This is 18-22 total hours across 7 days. Less time than most people spend scrolling social media in a week. Your campaign could be live and generating leads in exactly 7 days.
Week 2-4: Active management phase
Daily (10-15 minutes):
- Check signup count
- Review email metrics (opens, clicks)
- Respond to any direct messages or questions
- Note any issues in tracking spreadsheet
Weekly (30-60 minutes):
- Review full week performance
- Make one optimization (subject line, CTA, posting time)
- Plan next week’s promotional activities
Don’t make major changes in first 30 days. Collect data, make small improvements, stay consistent.
Month 2-3: Scale what works
Once you have 4-6 weeks of data showing consistent performance:
Add complexity:
- Extend email sequence (add Emails 6-8 for deeper nurture)
- Create second lead magnet targeting adjacent pain point
- Test paid traffic ($200-500/month) to proven landing page
Expand channels:
- Add one new social platform if current ones are working
- Test video content (repurpose top posts)
- Explore partnerships or guest posting
Improve conversion:
- A/B test landing page headlines
- Add social proof (testimonials, logos, numbers)
- Refine email segmentation
Deep-dive resources for going further
- Complete AI marketing automation playbook: Multi-channel strategy, advanced analytics, team building
- AI email marketing automation guide :Segmentation, behavioral triggers, A/B testing
- AI marketing automation ROI guide : Measuring and proving campaign ROI
Final thought: Execute this AI marketing campaign tutorial this week
Marketing automation isn’t about replacing your creativity or human touch. It’s about amplifying your reach and ensuring consistent follow-up so no lead falls through the cracks.
The difference between businesses thriving and those struggling is not budget, team size, or industry. It’s execution speed. The businesses growing right now launched AI marketing campaign tutorials like this 6-12 months ago. They didn’t wait for perfect conditions.
Your competitors are probably reading guides like this right now. The question is: who will execute first?
Your campaign can be live by this time next week. Start Day 1 today